This TrimUI Smart Pro S stock firmware installation guide is for users who bought the TrimUI Smart Pro S without an SD card, opting to use their own to start from scratch. It’s also useful for anyone who has encountered significant issues with their SD card / device and needs to reinstall from scratch.
What you’ll need:
- Laptop/PC
- MicroSD card reader
- Imaging software
- 7Zip
1. Update the Firmware on your TrimUI Smart Pro S #
The firmware on the TrimUI Smart Pro S is installed internally on the device (not on the SD card).
Turn on your device and compare the latest TrimUI Smart Pro S firmware with the version number you see in Settings > System > Device Info > Version on your TrimUI Brick. If your version is outdated, you should first update your console before moving on to any other step.
How to update the TrimUI Smart Pro S Firmware #
You need to format a fresh SD card as FAT32 (one with no existing content on). For the update to work, there should be nothing else on the microSD card but the update file. For this step, you will need a microSD card reader and PC/laptop.
Due to limitations with the regular Windows formatting tool, you will need to use third-party software. In our experience, any of these free tools will work:
For this guide, we will use the Raspberry Pi Imager, as we have found it to be the most reliable.
Connect your microSD card to your computer using the SD card reader and open Raspberry Pi Imager.
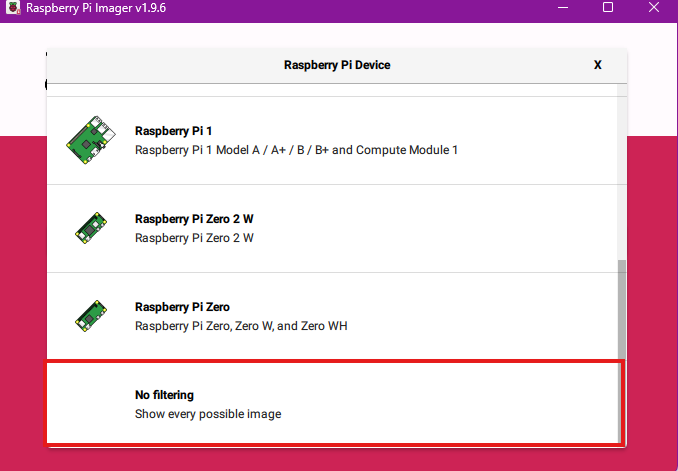
Step 1: Select “No Filtering” under Raspberry Pi Device
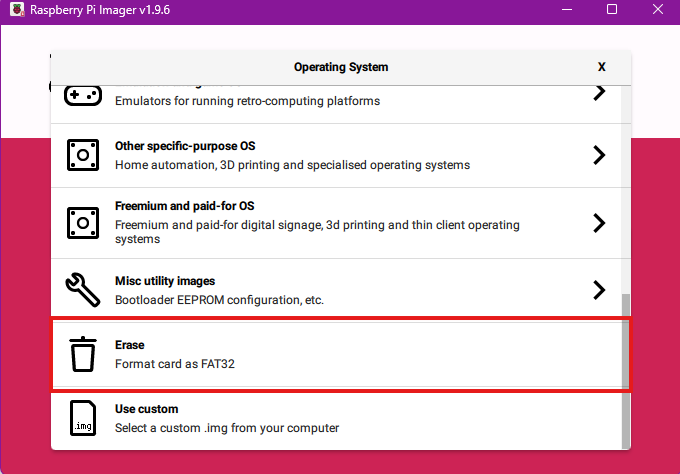
Step 2: Select “Erase” under Operating System
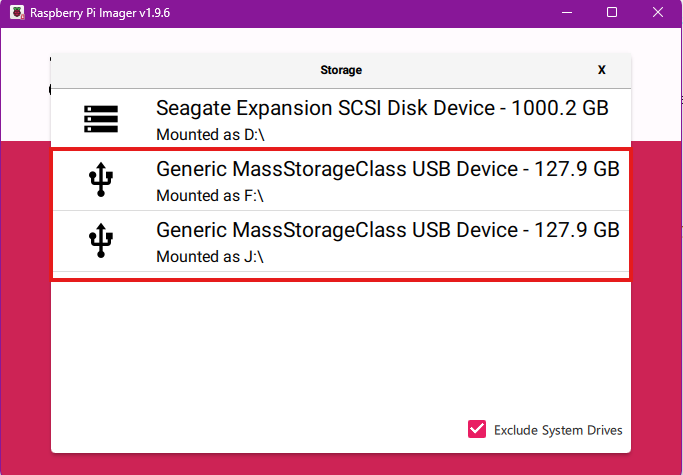
Step 3: Select your SD card from “Storage”. Make sure you select the right device. It will have a name similar to those shown below.
Transfer the update files to your MicroSD card #
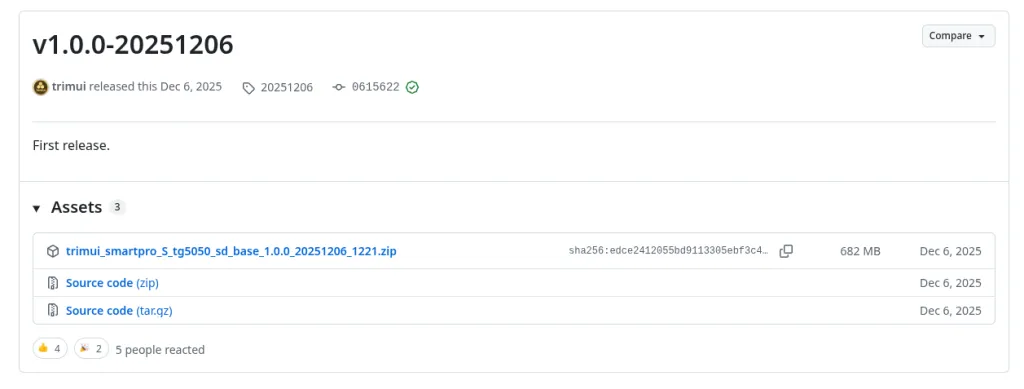
Head to the Smart Pro S firmware Github located here: https://github.com/trimui/firmware_smartpro_s/releases.
Download the latest release, it’ll be named with trimui_tg5050 and then a date and version. Extract the zip and head inside, you’ll see a file called trimui_tg5050.awimg. Copy that file to the ROOT of your SD card.
Safely remove the MicroSD card from your computer. (System tray > right click USB icon > eject [drive name])
Boot your TrimUI Smart Pro S #
Insert the MicroSD card into your TrimUI Smart Pro S.
Hold the VOL DOWN button while pressing POWER to turn on the device. Keep holding both buttons until you see a progress bar. Wait until this has complete. The device will restart when it’s finished.
Step 2. Install TrimUI Base Files #
For the device to function correctly, you’ll next need to install the TrimUI Smart Pro S Base Package.
Once downloaded, use 7Zip to extract the files to any folder. You won’t be able to extract the archive without this tool.
Reinsert your MicroSD card into your computer and copy the contents of base_package (the zip you just extracted) to the root of the SD card.
Once this is done, you have all of the necessary framework to add your BIOS and ROM files.
Step 3. Add your ROMs / BIOS Files #
Open the Roms folder on your microSD card. Here you’ll see a list of folders that correspond to the names of the game systems you want to emulate. Add your games to the corresponding system folders.
The BIOS folder is a little more hidden on the device. You may need to “show hidden files and folders” on your Windows machine to see it.
Head to: RetroArch > .retroarch > system
This is the folder where you add the BIOS files.
Once you’ve followed all of these steps, you can reinsert the microSD card into your TrimUI Smart Pro S and power up. You should now have a working system ready to play!